Sync phone contacts via OwnCloud
Give yourself peace-of-mind by backing-up and syncing your mobile phone contacts’ details to your own private cloud without the need to rely on third-party cloud services.
My mobile phone recently died. Thankfully my contacts were backed-up on my private cloud, so reimporting them onto my new phone was a breeze.
Like many other people, I’d had some trouble syncing my mobile phone contacts with my cloud but with recent updates to OwnCloud to version 8.2.1 and the Contacts app to 0.5, all seems to be good. Here’s how I was able to sync OwnCloud to my Android mobile phone.
Step 1: Upgrade all software
It’s always a good idea to keep software up-to-date, so ensure that your server is running the latest version of OwnCloud, including the Contacts app. (For the record, my Samsung Galaxy S5 is running Android 5.0 Lollypop).
Step 2: Install CardDAV-Sync Free
Go to the Google Play Store and download CardDAV-Sync Free. It’s free.
Step 3: Set-up CardDAV-Sync
Open CardDAV-Sync Free and click on “CardDAV”.
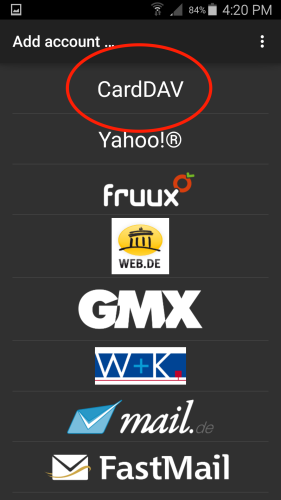
When opening CardDAV-Sync Free, click on “Card DAV”.
Proceed to fill in your OwnCloud details in CardDAV-Sync. Make sure that you don’t choose “One-Way-Sync” (sync from server to phone only).
You will need to use the full contacts path from your OwnCloud installation (eg: https://yourwebsite.com/remote.php/carddav/addressbooks/yourname/contacts). To discover what your CardDAV URL is, click on the cog in the bottom left corner of the Contacts app in OwnCloud.
The final step will be to choose an account name for this connection in CardDAV-Sync. I chose “dimech” as mine, but it can be anything that doesn’t match an existing account name on your phone.
Step 4: Export the contacts from your phone
Whilst CardDAV Sync may go through the motions of syncronising your contacts, this may not immediately work. OwnCloud requires that a copy of the phone’s contacts be imported into the application first. This is easy.
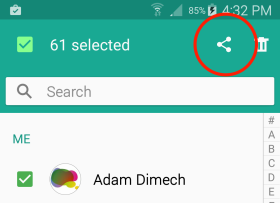
Go into “Contacts” on your phone and then choose “Select”. Select all contacts then press the “Share” icon:
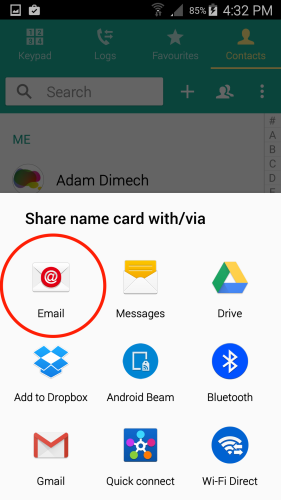
Choose “email” and compose an email to yourself. The email will contain a VCF file with all of your contacts’ details.
Step 5: Import the VCF into OwnCloud
Open your email and download the VCF file. Open OwnCloud and move to the Contacts app. Click on the cog in the bottom left corner of OwnCloud and choose “Import”.
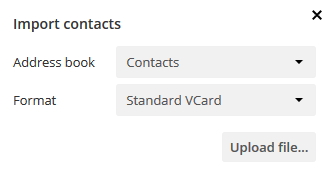
Choose “Contacts” as the address book and “Standard VCard” as the format. Click “upload file” and import the VCF.
Step 6: Sync contacts
Now the contacts in OwnCloud should match what’s on the phone. Syncing should now be possible!
Before we proceed any further, make a minor change to one of the contacts in OwnCloud such as updating an avatar or adding a dot to a name. We’ll use this subtle change to confirm that the contacts are indeed syncing.
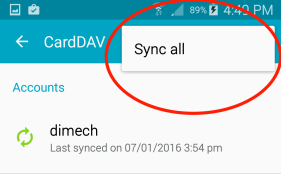
Return to the Contacts app on your mobile phone. Click on the three dots menu prompt at the top and choose “Settings”, then “Contacts”, then “Accounts”, then “CardDAV”. Click on the three dots menu prompt and choose “Sync all”.
The contacts should then sync. Be patient, it may take some time.
Step 7: Confirm that the sync works in both directions
Remember how I said to make a subtle change to one of the contacts in your address book in OwnCloud? If you now return to the address book on your phone, the change should be visible. Success!
The next step is to sync the phone the other way. Again, make a subtle change to one of your contact’s details, but this time on your phone. You could even restore the contact that you altered in OwnCloud.
Force the phone to re-sync by clicking on the three dots menu prompt at the top of the phone contacts and choosing “Settings”, “Contacts”, “Accounts” then “CardDAV”. Click on the three dots menu prompt and choose “Sync all”.
Now return to OwnCloud and conform that the change is visible there. If so, your phone is fully synced with OwnCloud. Congratulations!
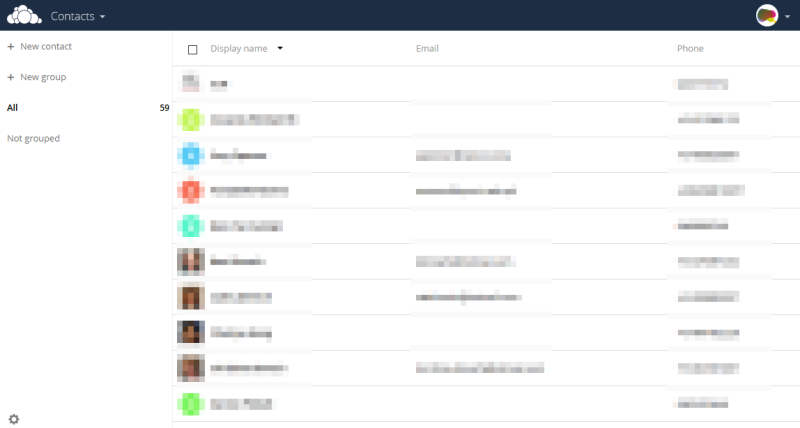
The OwnCloud Contacts web interface.
Peace of mind
The advantage of modern cloud computing is that it enables the automated backing-up of data so that the destruction of any one piece of equipment does not also destroy the data that it was using. Whilst there are many commercial services that will back-up contact data from phones (eg: Google’s GMail), many prefer the comfort of knowing that their data is not in the hands of corporate giants who could either exploit that data or otherwise hand it over to government agencies.
As I have written previously, I have installed OwnCloud onto my own servers in order to manage my data. It’s been set-up for approximately three months now and is working very nicely. It’s really good to know that if something does happen to my phone that I won’t have lost all of my contacts’ phone numbers and email addresses.
You can choose to sync your phone with OwnCloud as frequently as you like but I have set mine to “once a day”. After all, updates to one’s phone contacts is not usually a high frequency job.
Comments
One response to “Sync phone contacts via OwnCloud”
Thank you for the detailed information. Since this is an almost four years old post – I am very interested, if you still use your “own cloud” and how it is going with that?
Best regards from Germany
Hum