Display WordPress stories and images on a non-WordPress web page
Step-by-step instructions for including WordPress blog content on non-WordPress static web pages. This method is ideal for advertising ‘latest stories’ on a static website where the article headline, excerpt, date and thumbnail image are to be displayed.
WordPress is such a versatile blogging platform, but a significant challenge arises when one wants to include the contents of a WordPress blog (or series of blogs) on another web page outside of the WordPress installation. In my case, I have two separate WordPress installations on my server (The Grapevine and Code) which sit beside a static website.

For my latest project, I wanted to display the three most recent story headlines from each blog on a single static page outside of WordPress along with corresponding excerpts, dates of publication and a preview image for each story. This sounds surprisingly easy and it is, although instructions on the internet are hard to find.
Here’s how you can publish links to recent WordPress stories (including with excerpts and thumbnail images) on a non-WordPress static page.
Step 1: Activate “Featured Images” within your WordPress theme
Depending on its age, your WordPress theme may or may not have “featured images” (or thumbnails) enabled. To check whether your theme supports “preview images”, log into your WordPress dashboard and in the menu on the left, choose Posts > All Posts, then click on the title of any story.
Examine the right-hand column on your screen. If “featured images” are enabled, you will see the following box displayed:
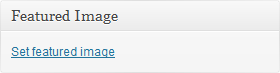
If this box isn’t present, you will need to enable “featured images” for each theme.
To do this, open functions.php (located at /wp-content/themes/[your theme name]/) and insert the following line of code:
add_theme_support( 'post-thumbnails' );Go back to the Dashboard within your WordPress installation. Click on Posts > All Posts, then click on the title of any story as you did previously. This will open-up the story page and the above box should be visible on the lower right-hand side.
Step 2: Create a “feature image” for each blog post
For our example today, we’ll be listing the three most recent stories. Therefore, it is important that the three most recent stories have feature images assigned to them.
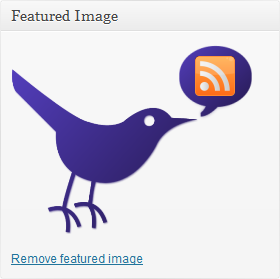
To do this, go to the Dashboard, click on Posts > All Posts, then click on the title of the most recent story. Under “Featured Image” click on the “Set featured image” link and either assign an image from your gallery or upload a new one. Please note, this will not alter the contents of your story, including your images.
When complete, you should be able to see your “featured image” within the box:
Repeat this process for the next two most recent stories in your first blog and then for your three most recent stories in the second installation.
Step 3: Create a generic “feature image”
Should a situation arise in the future where a blog post doesn’t have a “feature image”, you will need a generic image to fill the void (see later).
In your favourite image-editing programme, create a 150px×150px JPG image which will be displayed beside any story that lacks a “feature image”. Save this image to your WordPress image uploads folder (normally /wp-content/uploads/) as “thumbnail.jpg”.
Step 4: Create your PHP files
For the sake of simplicity, let’s call the first WordPress installation “Blog 1” and the second “Blog 2”. You will need to create separate php files for each and then reference them in a third in order for headlines to work in your static page.
Create two plain text files. Call one blog1.php and the second blog2.php.
Paste the following code into blog1.php:
<?php
define('WP_USE_THEMES', false);
require('/path/to/your/blog/wp-load.php');
query_posts('showposts=3');
?>

<?php while (have_posts()): the_post(); ?>
<?php endwhile; ?>

<?php while (have_posts()): the_post(); ?>
<h2><?php the_title(); ?></h2>
<p><em>Posted <?php the_date(); ?> by <?php the_author(); ?></p></em>
<p><?php
	if ( has_post_thumbnail() )
		the_post_thumbnail( 'thumbnail' );
	else
		echo '<img src="/path/to/thumnail.jpg" alt="Example Image" title="Example" width="100px"/>';
?></p>
<p><?php the_excerpt(); ?></p>
<p><a href="<?php the_permalink(); ?>">Read more...</a></p>
<?php endwhile; ?>
Adjust the following parameters for your “Blog 1” WordPress installation:
- Line 3: Change
"/path/to/your/blog/wp-load.php"to point to the directory that hosts your wp-load.php file. - Line 4: Specify the number of posts that you want displayed from “Blog 1”. In our example, we will choose 3 but if you prefer another number, change
"('showposts=3');"to reflect this. - Line 17: Change
"/path/to/thumnail.jpg"to refer to the generic Feature Image that you created in Step 3. You can change the ‘alt’ and ‘title’ parameters too if desired.
For each blog post in “Blog 1”, this code will display the following items in this order:
- The post’s title (the_title)
- The date that the article was published (the_date)
- The post Feature Image (if it has one) or the generic Feature Image if not.
- The story’s excerpt (the_excerpt)
- A “read more” link (the_permalink)
Repeat the same for blog2.php, but this time change the parameters so that they work for “Blog 2” (Line 3 is critical).
Save blog1.php and blog2.php and upload to your server via FTP.
Step 5: Create your static web page.
Using your favourite web page editing programme, create a new PHP file (or open an existing one) that has <head>, <title> and <body> tags as a minimum.
Insert the following code into the <body> at the point where you would like to display the three most recent stories from “Blog 1”. Don’t forget to change the path directories to match that on your server:
<?php echo file_get_contents("http://www.example.com/blog1.php"); ?>Insert the following code into the <body> where you would like to display the three most recent stories from “Blog 2”, again changing the path directories to match your server:
<?php echo file_get_contents("http://www.example.com/blog2.php"); ?>Save your php file and upload to your web server.
Step 6: Check your code
Using your favourite browser, point to the last file that you made.
You should be able to see three stories from each blog, complete with a preview image, abstract, date and link.
Optional Extras
Once you get this to work, you can add more parameters (called Function References) at Step 4, such as the story’s author (the_author) or category (the_category) or ID (the_ID) or tags (the_tags).
You can also change the surrounding HTML to alter formatting (in my example, each parameter is displayed between <p> tags except for the header which is between <h2> tags. These can be changed to <div> or <span> with ID’s assigned).
Comments
3 responses to “Display WordPress stories and images on a non-WordPress web page”
Hi, I’ve just tried to implement the code you have above to pull in blog posts on the home page of a static website but I can’t seem to get it working.
I am currently working on a static website and have WordPress installed in a sub folder (/blog) – this is a separate page/link in the main menu of the site. So what I am trying to do is pull in the 3 most recent posts with thumbnails, I’ve double checked the code I have entered above and can’t see anything different.
The problem is my page is not displaying anything where the posts should be.
Any ideas?
Cheers,
Al.
Hello Al,
Is the page that you are trying to display the posts in have a .php extension? If so, does the source code indicate a PHP error? If not, is the rest of the page’s HTML displaying?
This is a tricky problem to diagnose without seeing the page.
Hi. Is there a way I can split the display of 3 posts to fit a bootstrap layout similar to the example below:
<!-- Show post 1 -->

<!-- Show post 2 -->

<!-- Show post 3 -->
Because post 1 will have a different class to posts 2 and 3?
any ideas?
Thanks in advance.