Enabling SSL and HTTPS on a WordPress site
Step-by-step instructions for enabling your WordPress blog or website to be served over HTTPS using SSL or TLS.
There is a movement online which seeks to encourage website owners to implement SSL or TLS across their entire websites and serve all content over HTTPS, rather than just pages managing sensitive-content. There are some good reasons to do this, not withstanding the fact that Google has elevated HTTPS as a ranking signal.
Implementing HTTPS for a WordPress website is rather easy, although it can look daunting. Here are the steps that you should go through in order to serve your entire WordPress website over HTTPS.
Step 1: Buy a certificate
There are many SSL certificate vendors out there and many types of certificates available that range in price considerably. Let’s Encrypt is an automated and open Certificate Authority which offers 90-day SSL/TLS certificates for free. I recommend them.
Installing a certificate is easy via cPanel. If this option isn’t available to you, contact your web hosting company.
Step 2: Utilise protocol-relative URLs in your theme
The HTML in your WordPress theme is probably filled with links that look like this:
<a href="http://www.mysite.com.au/link/to/resource.htm">Remove all references to http: from your theme code and instead use protocol-relative URLs:
<a href="//www.mysite.com.au/link/to/resource.htm">Check all of the files in your theme, but don’t stop at your HTML either. Look at your CSS too, including any embedded fonts!
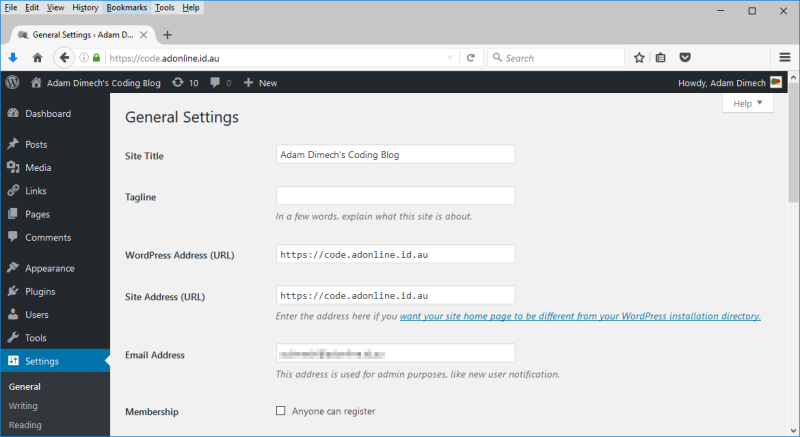
Step 3: Change your WordPress URL
Log into your WordPress administration (wp-admin). Navigating the menu on the left, go to Settings > General and change the Word Press Address and Site Address URLs from http:// to https://.
Step 4: Force SSL for wp-admin
WordPress offers a setting to force the wp-admin to be accessible only over HTTPS. To activate this, edit your wp-config.php and add the following line:
define('FORCE_SSL_ADMIN', true);Once complete, you should be automatically redirected from http://www.mysite.com.au/wp-admin/ to https://www.mysite.com.au/wp-admin/
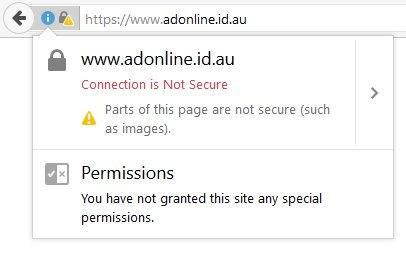
Step 5: Check for mixed-content warnings
When a HTTPS web page is requested but contains content served over HTTP (such as embedded images), most browsers will give a “mixed content” warning. Aside from being a security risk, mixed content warnings alarm visitors. You will need to carefully check the code of your web pages and identify any remaining sources of “mixed content”, such as:
- Images
- JavaScripts
- CSS
- Fonts
- Social media plug-ins
- Embedded third-party content
Identifying these can sometimes be a challenge, but they need to be remedied prior to moving on to the next step.
Step 6: Redirect all traffic to HTTPS
The last key step is to redirect all traffic to HTTPS automatically, using the .htaccess file on your server. In a text-editor, open your site’s .htaccess file and include the following:
# BEGIN WordPress
<IfModule mod_rewrite.c>
RewriteEngine On
RewriteBase /

RewriteCond %{HTTPS} !=on
RewriteRule ^ https://%{HTTP_HOST}%{REQUEST_URI} [L,R=301]

RewriteRule ^index\.php$ - [L]
RewriteCond %{REQUEST_FILENAME} !-f
RewriteCond %{REQUEST_FILENAME} !-d
RewriteRule . /index.php [L]

</IfModule>
# END WordPress
This has the added benefit of issuing a 301 “moved permanently” status code. This will tell search engines that the page has been permanently moved to HTTPS.
Step 7: Enable HSTS
Enabling HTTP Strict Transport Security is a very good idea. To enable this, add this line to your .htaccess file:
Header set Strict-Transport-Security "max-age=31536000; includeSubDomains" env=HTTPSStep 8: Tell the world!
That’s it, you’re done! Whilst you may be tempted to send out a Tweet, you may also want to update Google Webmaster Tools and any other third-party services that your website may be using.
Comments
No comments have yet been submitted. Be the first!