Rearrange Excel columns via Visual Basic
A simple VBA script for rearranging the order of columns in an Excel spreadsheet.
In the following worksheet example, the columns are arranged in the order Header 1, Header 2, Header 3, Header 4, Header 5 and Header 6.

The following Visual Basic for Applications (VBA) script will rearrange them in the order Header 6, Header 2, Header 1, Header 4, Header 5 and Header 3. Simply change the parameters in the code to suit the spreadsheet that you’re working on. Unlisted or missing columns will be ignored.
Sub Reorder_Columns()
Dim ColumnOrder As Variant, ndx As Integer
Dim Found As Range, counter As Integer
	ColumnOrder = Array("Header 6", "Header 2", "Header 1", "Header 4", "Header 5", "Header 3")
counter = 1

Application.ScreenUpdating = False

For ndx = LBound(ColumnOrder) To UBound(ColumnOrder)
    Set Found = Rows("1:1").Find(ColumnOrder(ndx), LookIn:=xlValues, LookAt:=xlWhole, SearchOrder:=xlByColumns, SearchDirection:=xlNext, MatchCase:=False)
    If Not Found Is Nothing Then
        If Found.Column <> counter Then
            Found.EntireColumn.Cut
            Columns(counter).Insert Shift:=xlToRight
            Application.CutCopyMode = False
        End If
    counter = counter + 1
    End If
Next ndx
Application.ScreenUpdating = True
End Sub
The result of this script is as shown:

Activating the script
Step 1
Open the Excel sheet that needs to be modified.
Step 2
Press Alt + F11 or otherwise go to the Developer ribbon and choose the “Visual Basic” icon if the Developer Tab is enabled.
Step 3
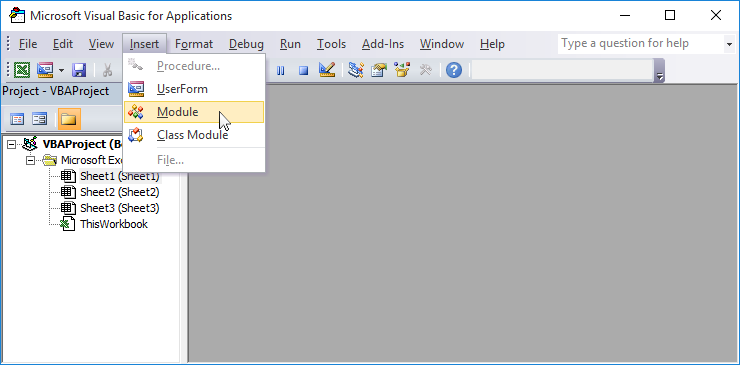
In the Visual Basic for Applications toolbar, go to Insert > Module

Insert the above code into the module.
Step 4
Press F5 to run the macro and execute the code.
Comments
22 responses to “Rearrange Excel columns via Visual Basic”
Hmmm. For some reason, when I try to run the code I am getting a compile error and my column names are in red text. The only thing that I changed in the above code is my column names. Does the name of my spreadsheet or workbook matter?
Never mind. I changed my column names to header 1, etc. and it worked. Thank you very much for the code.
If you are going to publish my comments, please replace my last name to the initial “P.”
Hello Michael, please refer to the Editorial Policy. Comments will be published as they’re received. If you don’t wish for your surname to be published then don’t supply it.
Thank you! This was a great example. It was easy to understand and was just what I was looking for.
Working Great, thank you so much:)
Thanks a lot,Really Helfulll
Hello sir , this code helped me lot ,it reduced my 30 min of Daly work .
Thanks! Saved me a lot of time.
Thank you very much!
It really helps! Thank you:D
if some of those columns have a same name, ex: Header 1,Header 2, Header 2, Header 2, Header 3, Header 4, Header 5, Header 6 , “SearchDirection:=xlNext” may have a problem. I think “SearchDirection:=xlPrevious” is better.
This worked for all the columns that were formatted as text. However, it ignore the columns that were formatted as Number (Accounting). Can you please add/include the Number format in the script.
Really Nice code!!!
Works great, but I get a sytax error, I’m wanting to rearrange 100 – 120 columns, is there a limit?
Thanks!
Hi Adam,
Great code, thank you! Can you describe how to rename the columns after moving, please?
Best,
Dylan
Doesnt work. Nothing at all happens. Nothing. Not even an error. I think its missing some descriptive steps, more detailed example would be useful.
Thank you *so* much for sharing this! It totally automated a 111 column rearrangement flawlessly and made out reporting lives *so* much better. 10/10 would recommend again!
To any having problems:
Make sure the number of headers listed in the macro module and that are on your sheet match.
You can insert a row at the top and add “header 1”, “header 2”, “… 3”, “etc.”, (also see above) and run the macro.
You can copy your headers and replace “header 1”, “header 2”, “… 3”, “etc.” in the module, with the actual header titles you have on the sheet and run the macro.
This is so helpful!! However if I have 2 columns to the left of what is being sorted, is there any way to lock those in place and not sort through those? i.e. start the rearrange from column C to the end?
How can add the unlisted column on the spreadsheet? Even if I don’t have the data for each column I still need to have the listed column mentioned in the script.
Thanks
TOTALLY AWESOME – I tried many methods that either didn’t work or were so clunky they basically had to be rewritten for each new spreadsheet. This is so simple and worked flawlessly with text, date and currency columns.
For sheets with many columns I copy header row into a comment to be sure I don’t miss any.
I also created an alternate version using Input boxes to rearrange columns without opening macro (for other users, or if I’m deciding column arrangement on the fly).
Dim Hdr1 As String, Hdr2 As String, Hdr3 As String
Hdr1 = Application.InputBox(“Col A Header”, Type:=2)
Hdr2 = Application.InputBox(“Col B Header”, Type:=2)
Hdr3 = Application.InputBox(“Col C Header”, Type:=2)
Hi
Could you show how this code can be run from access editor please.
Ta
De
Hi
Thank you for the code it was really helpful!
If you wish to avoid using array/variant and therefore spare memory I suggest this edit :
Sub Reorder_Columns()Dim ColumnOrder As String
Dim Found As Range
Dim ndx As Integer
ColumnOrder = ("Header 6,Header 2,Header 1,Header 4,Header 5,Header 3")
Application.ScreenUpdating = False
For ndx = 1 To 6 'maximal index of header
Set Found = Rows("1:1").Find(Split(ColumnOrder, ",")(ndx - 1), LookIn:=xlValues, LookAt:=xlWhole, SearchOrder:=xlByColumns, SearchDirection:=xlNext, MatchCase:=False)
If Not Found Is Nothing Then
If Found.Column ndx Then
Found.EntireColumn.Cut
Columns(ndx).Insert Shift:=xlToRight
Application.CutCopyMode = False
End If
End If
Next ndx
Application.ScreenUpdating = True
End Sub